介绍

本模块是基于 MicroPython bluetooth 提供更高级抽象的BLE应用的驱动库。 为初级蓝牙BLE的初阶用户,提供友善的接口,用户可以很简易的实现BLE的应用。
本模块适用于 MicroPython 及衍生的相关项目,如掌控板 mPython 。
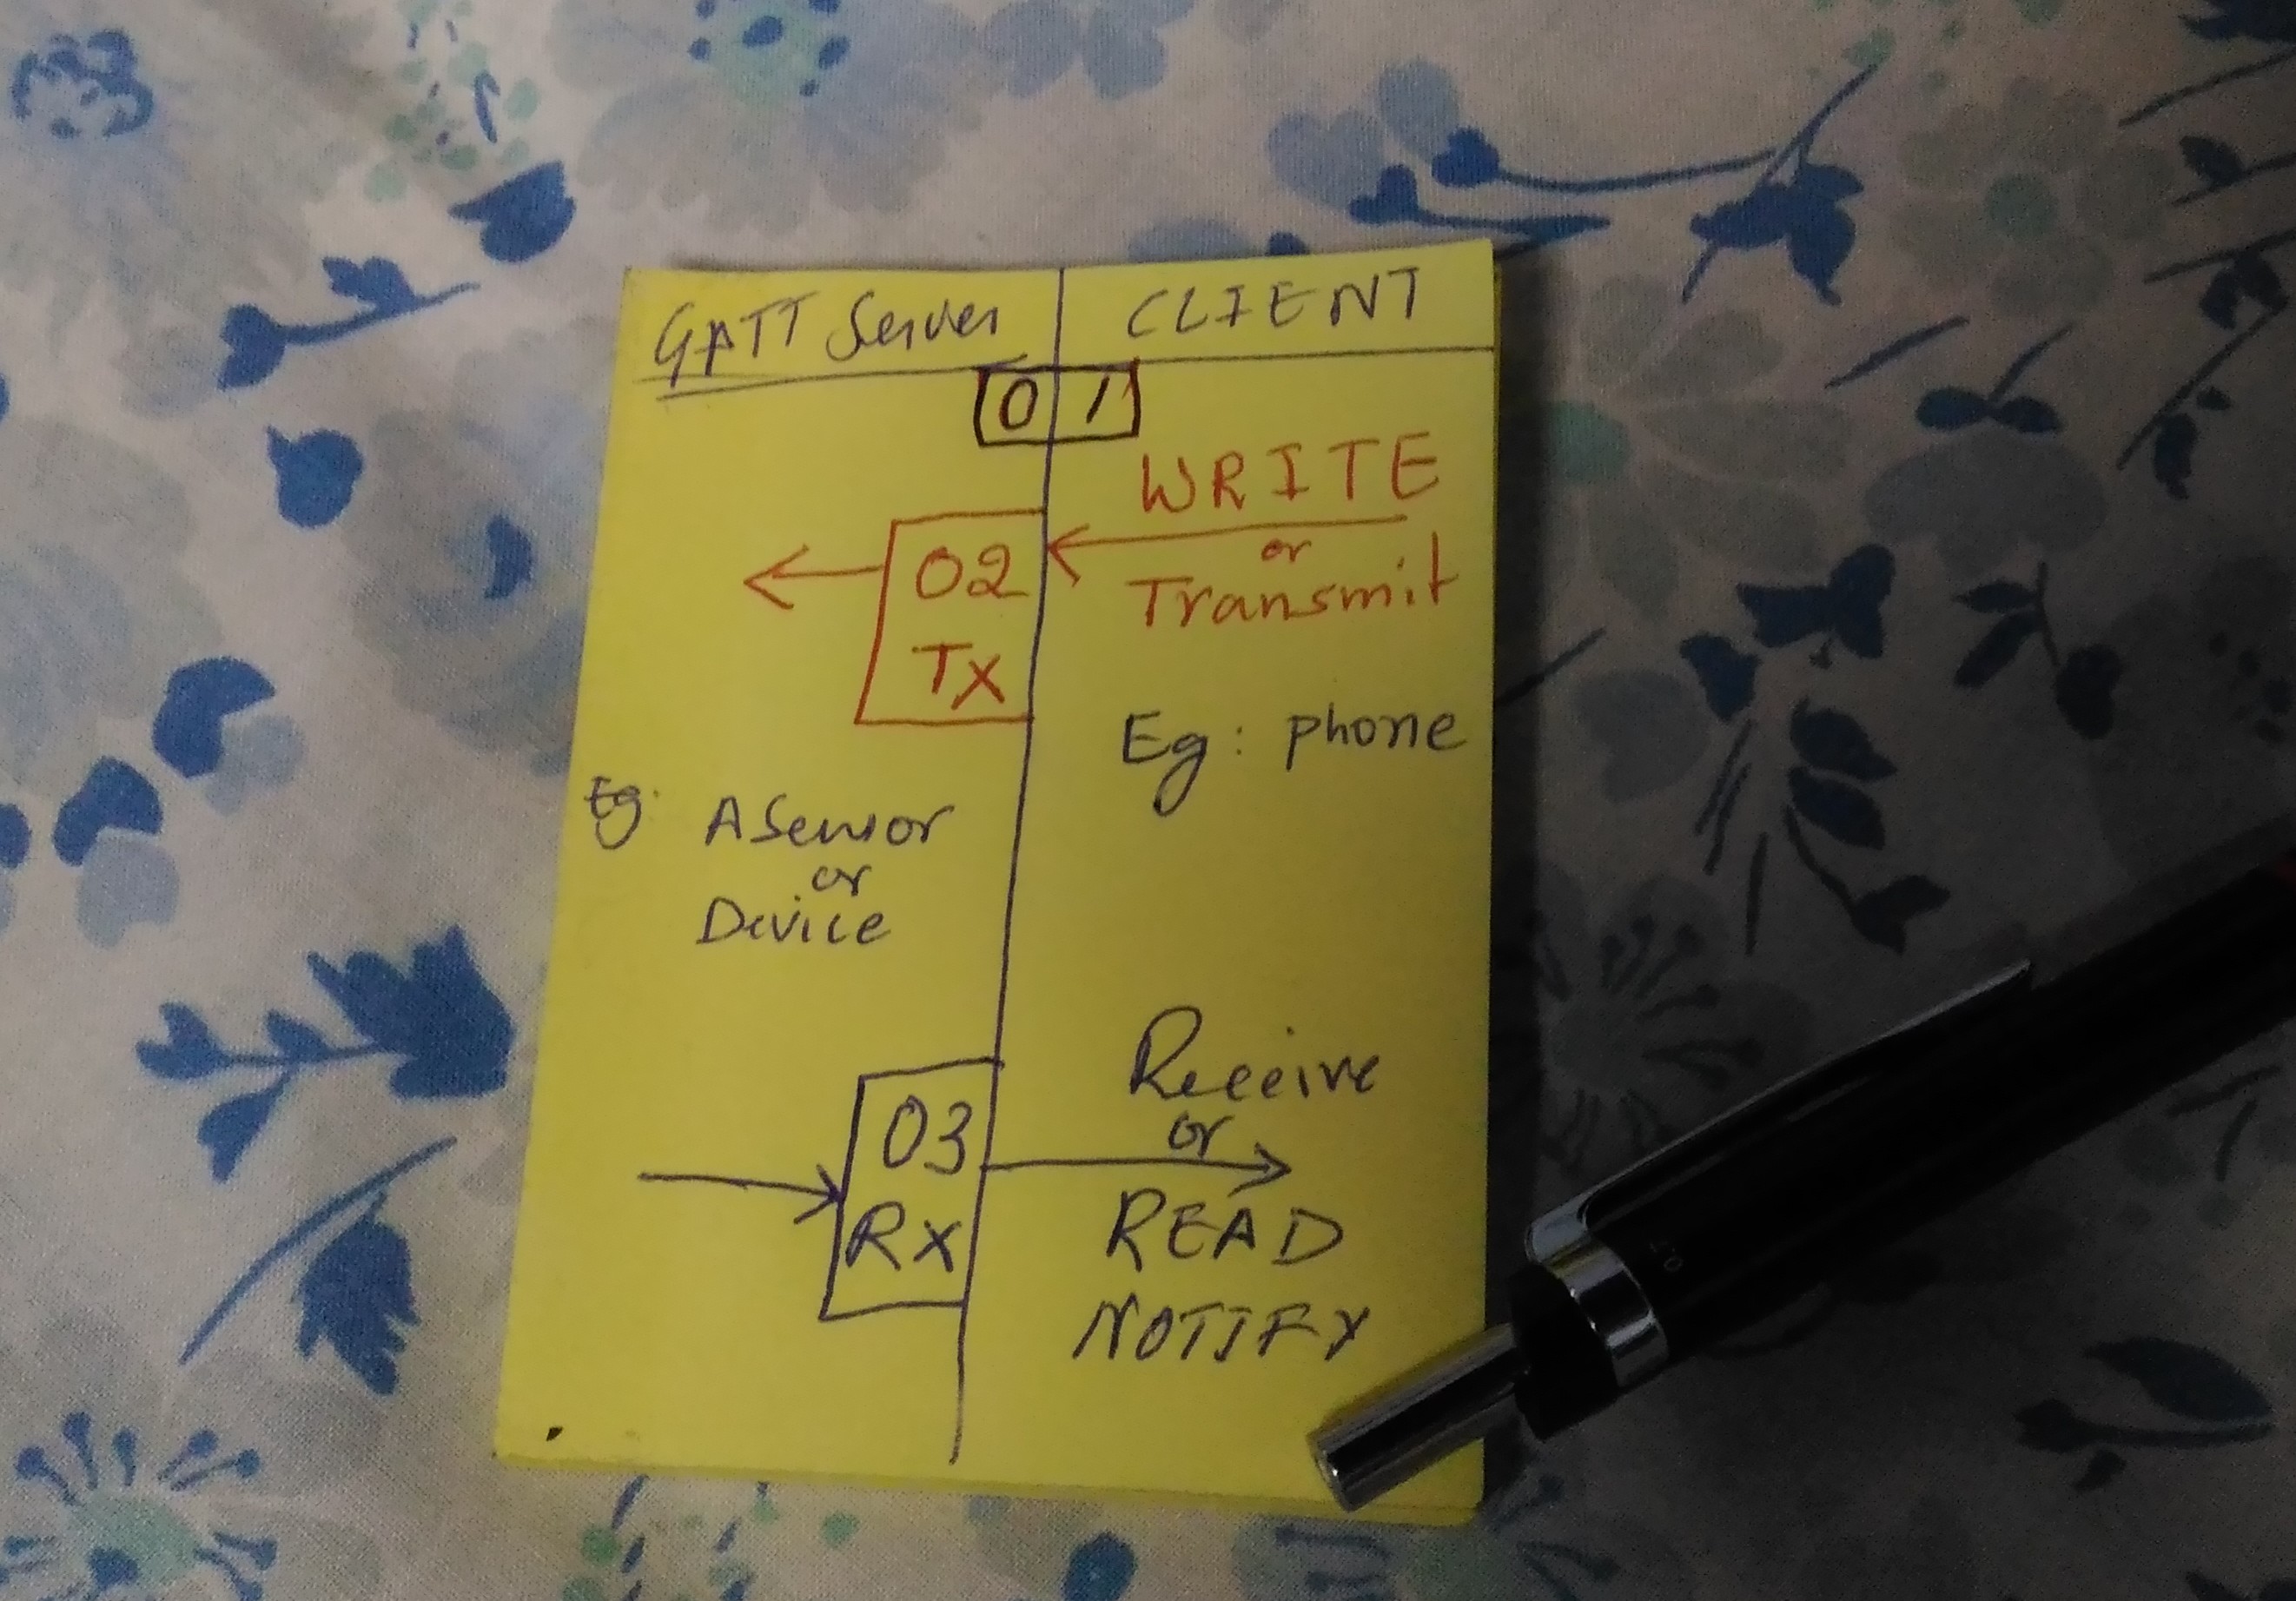
模块根据蓝牙BLE的应用和饰演的角色,设计以下几大功能点:
- 外围设备(Peripheral)
- 中央设备(Centeral)
- 串口透传(Uart)
- 人机交互设备HID
快速入门
首先需要将 mpython_ble 库上传到MicroPython的文件系统中。
在实例BLE Peripheral 设备前,先要配置 GATT Profile,注册一些服务和特征。通过profile来描述设备包含什么样的应用服务。 Bluetooth 标准协议 里根据常用的蓝牙设备定义了通用的服务和特性,以便BLE设备间可更好的识别、兼容。 你可以按GATT中 16 bit的UUID来配置profile,或用128bit UUID 来定义自己的服务。
下面以体温计为例,我们可以需要在profile添加以下服务:
- Health Thermometer : 蓝牙标准协议里规体温服务的正式16 bit UUID识别码是0x1809;还有需要添加必选项 Temperature Measurement 特征(0x2A1C)。
- Device Information : 用于描述设备信息。添加 Manufacturer Name String 特征,用于描述制造商名称。
实例 Health Thermometer Service 对象并添加 Temperature Measurement Characteristic:
>>> from mpython_ble.services import Service
>>> from mpython_ble.characteristics import Characteristic
>>>
>>> health_thermometer_service = Service(UUID(0x1809))
>>> temperature_measurement_charact = Characteristic(UUID(0x2A1C), properties='-rn')
>>> health_thermometer_service.add_characteristics(temperature_measurement_charact)
实例 Device Information Service 对象并添加 Manufacturer Name String Characteristic:
>>> device_info_service = Service(UUID(0x180A))
>>> manufacturer_name = Characteristic(UUID(0x2A29),, properties='-r')
>>> device_info_service.add_characteristics(manufacturer_name)
完成 health_thermometer_service 和 device_info_service 服务后,将服务添加至 profile 中:
>>> from mpython_ble.gatts import Profile
>>> profile = Profile()
>>> profile.add_services(health_thermometer_service,device_info_service)
下面我们可以通过数组索引方式很方便的读取 profile 的服务、特性:
>>> profile
<Profile: <Service UUID16(0x1809): <Characteristic UUID16(0x2a1c), '-rn'>>, <Service UUID16(0x180a): <Characteristic UUID16(0x2a29), '-r'>>>
>>> profile[0] # first service
<Service UUID16(0x1809): <Characteristic UUID16(0x2a1c), '-rn'>>
>>> profile[1] # second service
<Service UUID16(0x180a): <Characteristic UUID16(0x2a29), '-r'>>
>>>
>>> profile[0][0] # Read temperature_measurement Characteristic
<Characteristic UUID16(0x2a1c), '-rn'>
现在我们看下如何通过配置好的 profile 来实例 Peripheral BLE外设。
profile.services_uuid 是service的UUID列表。Peripheral 里的 adv_services 参数为需要广播的服务。
>>> profile.services_uuid
[UUID16(0x1809), UUID16(0x180a)]
>>>
>>> from mpython_ble.application import Peripheral
>>> ble_thermometer = Peripheral(name=b'ble_thero', profile=profile, adv_services=profile.services_uuid)
BLE: activated!
BLE 功能激活后,开启广播:
>>> ble_thermometer.advertise(True)
你可以用手机的 nRF Connect app 来连接蓝牙设备
往 Temperature Measurement Manufacturer Name String 特征里写值。 由于温度值是浮点型的,为了便于解读,我们将温度值*100。蓝牙协议里规定字节的储存顺序为小端在前。int 转 Bytes,要用到 struct 来打包数据。
写入温度值,并通知连接主机:
>>> import struct
>>> temperature_value = 37.36
>>> ble_thermometer.attrubute_write(temperature_measurement_charact.value_handle, struct.pack("<H",int(temperature_value*100)),notify=True)
写入制造商名称:
>>> ble_thermometer.attrubute_write(manufacturer_name.value_handle,b'mpython')
这时,你可以在主机端,读取到被写入的值。

目录
简单的温度外设
1 2 3 4 5 6 7 8 9 10 11 12 13 14 15 16 17 18 19 20 21 22 23 24 25 26 27 28 29 30 31 32 33 34 35 36 37 38 39 40 |
from mpython_ble.gatts import Profile
from mpython_ble import UUID
from mpython_ble.services import Service
from mpython_ble.characteristics import Characteristic
from mpython_ble.application import Peripheral
import time
import struct
import random
# 实例profile
profile = Profile()
# 实例Service 环境传感器服务(0x181A)
# org.bluetooth.service.environmental_sensing
env_sense_service = Service(UUID(0x181A))
# 实例 Characteristic 温度特征(0x2A6E),权限为可读,通知
# org.bluetooth.characteristic.temperature
temp_char = Characteristic(UUID(0x2A6E), properties='rn')
# 环境传感器服务添加温度特征
env_sense_service.add_characteristics(temp_char)
# 将服务添加到profile
profile.add_services(env_sense_service)
# 实例BLE外设
perip_temp = Peripheral(name=b'mpy_temp', profile=profile, adv_services=[env_sense_service.uuid])
# 开始广播
perip_temp.advertise(True)
t = 25
i = 0
while True:
# Write every second, notify every 10 seconds.
time.sleep(1)
i = (i + 1) % 10
# Data is sint16 in degrees Celsius with a resolution of 0.01 degrees Celsius.
# Write the local value, ready for a central to read.
perip_temp.attrubute_write(temp_char.value_handle, struct.pack('<h', int(t * 100)), notify=i == 0)
# Random walk the temperature.
t += random.uniform(-0.5, 0.5)
|
中央设备连接温度外设
1 2 3 4 5 6 7 8 9 10 11 12 13 14 15 16 17 18 19 20 21 22 23 24 25 26 27 28 29 30 31 32 33 34 35 36 37 38 39 40 41 42 43 44 45 46 47 48 49 50 51 52 |
from mpython_ble.application import Centeral
from mpython_ble import UUID
import time
import struct
def convert_temperature(bytes_):
"""温度值还原"""
# 对bytes拆包,转为整形数据。字节的储存顺序为little-endian,无符号整形,2字节。
# 除100,还原浮点型
temperature = struct.unpack("<H", bytes_)[0]/100
return temperature
# 实例BLE中央设备
temp_centeral = Centeral()
# 扫描 temperature device 并连接
while True:
temp_profile = temp_centeral.connect(name=b'mpy_temp')
if temp_centeral:
break
time.sleep(2)
print("Connected temperature device. gatt profile:")
# print service
for service in temp_profile:
print(service)
def temperature_notify_callback(value_handle, notify_data):
"""温度特征值的通知事件的回调函数"""
global temp_characteristic
# 判断是否为温度特征句柄值
if value_handle == temp_characteristic.value_handle:
temperature = convert_temperature(notify_data)
print("temperature notify: {}" .format(temperature))
for service in temp_profile:
# 查询 environmental_sensing 服务
if service.uuid == UUID(0x181A):
print("find environmental_sensing service (0x181a)")
for characteristics in service:
print("find temperature characteristic (0x2a6e)")
if characteristics.uuid == UUID(0x2A6E):
temp_characteristic = characteristics
temperature_bytes = temp_centeral.characteristic_read(temp_characteristic.value_handle)
print("temperature value is: {}" .format(convert_temperature(temperature_bytes)))
# 设置温度特征值的回调函数
temp_centeral.notify_callback(temperature_notify_callback)
|
Nordic UART
通过 Nordic UART 服务的应用,实现与上位机位端(手机或电脑)的串口通信。
1 2 3 4 5 6 7 8 9 10 11 12 13 14 15 16 17 18 19 20 21 22 23 24 25 26 27 28 29 30 31 32 | # The MIT License (MIT)
# Copyright (c) 2020, Tangliufeng for labplus Industrie
# Nordic UART 服务的外围设备的示例
# 中央设备端可用手机APP,"nRF Conenct" 或 "nRF Toolbox",配合使用
from mpython_ble.application import BLEUART
import time
uart = BLEUART(name=b'ble_uart')
def rx_irq():
"""串口接收中断函数定义"""
print('Receive: ', uart.read().decode().strip())
uart.irq(handler=rx_irq) # 串口中断
# 发送数据
nums = [4, 8, 15, 16, 23, 42]
i = 0
try:
while True:
uart.write(str(nums[i]) + '\n')
i = (i + 1) % len(nums)
time.sleep_ms(1000)
except KeyboardInterrupt:
pass
uart.close()
|
使用 "nRF Connect" 、"nRF Toolbox"等上位机软件或app inventor自己制作APP,来收发BLE UART的数据。

nRF Connect 查看UART gatt

nRF Toolbox 演示与UART与上位机的通讯应用
人机交互设备-翻页笔
1 2 3 4 5 6 7 8 9 10 11 12 13 14 15 16 17 18 19 20 21 22 23 24 25 26 27 28 29 30 31 32 33 34 35 36 37 38 39 40 41 42 43 44 45 | # The MIT License (MIT)
# Copyright (c) 2020, Tangliufeng for labplus Industrie
# 蓝牙PPT翻页笔
# 下一页: A键 / 上一页: B键
from mpython_ble.application import HID
from mpython_ble.hidcode import KeyboardCode
from mpython import oled, button_a, button_b
import time
import music
ppt_remote = HID(name=b'ble_ppt') # 实例 BLE HID设备
oled.DispChar("蓝牙ppt翻页笔", 20, 10)
oled.DispChar("说明:下页A键 下页B键", 0, 30)
oled.show()
# 初始化button_before标记变量
btn_a_stat_before = button_a.value()
btn_b_stat_before = button_b.value()
while True:
# 读取button_a,button_b状态
btn_a_stat_current = button_a.value()
btn_b_stat_current = button_b.value()
time.sleep_ms(20)
# 检测A键按下时,发送键盘按键码,"PgUp"
if button_a.value() == btn_a_stat_current:
if btn_a_stat_before ^ btn_a_stat_current:
if btn_a_stat_before == 1:
ppt_remote.keyboard_send(KeyboardCode.PAGE_UP)
music.pitch(2000, 50, wait=False)
print("pressed Page Up!")
btn_a_stat_before = btn_a_stat_current
# 检测B键按下时,发送键盘按键码,"PgDown"
if button_b.value() == btn_b_stat_current:
if btn_b_stat_before ^ btn_b_stat_current:
if btn_b_stat_before == 1:
ppt_remote.keyboard_send(KeyboardCode.PAGE_DOWN)
music.pitch(2000, 50, wait=False)
print("pressed Page Down!")
btn_b_stat_before = btn_b_stat_current
|
Beacon
1 2 3 4 5 6 7 8 9 10 11 12 13 14 15 16 17 | # The MIT License (MIT)
# Copyright (c) 2020, Tangliufeng for labplus Industrie
# iBeacon 示例
# 手机使用nRF Beacon app配合示例演示Beacon功能
from mpython_ble.application.beacon import iBeacon
from mpython_ble import UUID
# Proximity UUID
uuid = UUID("01122334-4556-6778-899a-abbccddeeff0")
# 构建iBeacon 对象
beacon = iBeacon(proximity_uuid=uuid, major=1, minor=2)
# 开始广播
beacon.advertise(Toggle=True)
|
mpython_ble
-
class
UUID(value)
用指定的值创建一个UUID实例。与 bluetooth.UUID 类相同。
该值可以是:
- 一个16位整数。例如
0x2908。- 128位UUID字符串。例如
6E400001-B5A3-F393-E0A9-E50E24DCCA9E。>>> from mpython_ble import UUID >>> UUID(0x2908) UUID16(0x2908) >>> UUID("6E400001-B5A3-F393-E0A9-E50E24DCCA9E") UUID128('6e400001-b5a3-f393-e0a9-e50e24dcca9e')
子模块目录 :
mpython_ble.application
基于蓝牙BLE的应用,本模块中定义了Peripheral(外围设备) 和Centeral(中央设备)两大类。
- 外围设备:这一般就是非常小或者简单的低功耗设备,用来提供数据,并连接到一个更加相对强大的中心设备。例如蓝牙心率计。
- 中心设备:中心设备相对比较强大,用来连接其他外围设备。例如手机、电脑等。
在蓝牙应用中外围设备最为广泛,涵盖的设备多种多样。本模块中基于 Peripheral 类,又再封装了 UART 和 HID ,用于串口收发和人机交互设备的应用。
Peripheral类
BLE 外围设备
构建对象
-
class
Peripheral(profile, name=b'mpy_ble', appearance=None, adv_services=None, resp_services=None, interval_us=500000, connectable=True)¶ - profile - GATT
Profile实例对象。用于描述BLE设备具备哪些服务信息。有关Profile的用法,请查阅Profile类。 - name - 蓝牙设备名称。类型为字节类型。
- appearance - 16-bit 数字编码。定义蓝牙设备的外观,像电脑或手机会根据该外观标识,给定外观图标。默认为None。
- adv_services - 广播负载服务。外围设备会向广播通达发送设备的广播数据,告诉主机,设备具有哪些服务。
- resp_services - 扫描应答负载服务。当主机主动扫描广播设备,发起Scan Request,外围设备会应答resp_services服务。
- interval_us - 以指定的时间间隔(以微秒为单位)广播
- connectable - 设置外围设备是否为可连接,默认为 True , False 则设备为单纯的广播者,不可连接。
- profile - GATT
实例完成且BLE蓝牙开启,完成蓝牙服务注册后。会将 profile 里的属性的句柄赋值到相应的 value_handle。以便后面对属性进行读写操作。
提示
- 考虑到esp32的内存有限,所以并没有在类中没有定义appearance常量, 用户可根据 appearance_definition 按需自定义。
- 由于广播报文有长度限制37 Bytes。在配置 adv_services,resp_services 参数时,需注意广播的服务不能太多,应合理分配。
方法
-
Peripheral.advertise(toggle=True)
外围设备广播开关。 toggle 为 True 则,开始广播; False 则停止广播。
-
Peripheral.attrubute_read(value_handle)
读取BLE设备的属性值,返回类型为 Bytes 类型。
- value_handle - Characteristic或Descriptor属性的值柄
-
Peripheral.attrubute_write(value_handle, data, notify=False)
写BLE设备的属性值。
- value_handle - Characteristic或Descriptor属性的值柄
- data - 写入的字节数据。类型为 Bytes 。
-
Peripheral.connection_callback(callback)
外围设备与中央设备建立连接的回调函数。回调函数的参数定义 callback_function(conn_handle, addr_type, addr)。conn_handle 参数为连接的句柄, addr_type 为地址类型 , addr 为发起连接 的中央设备的MAC地址,类型为 Bytes 。
-
Peripheral.write_callback(callback)
当BLE设备的属性值被写操作的回调函数。callback_function(conn_handle, attr_handle, data)。conn_handle 参数为连接的句柄, attr_handle 为被写得属性值柄 , data 为写入的数据,类型为 Bytes 。
-
Peripheral.disconnect()
外围设备断开与中央设备的连接。
-
Peripheral.mac
返回外围设备的MAC地址,类型为 Bytes 。
Centeral类
中央设备
方法
-
Centeral.connect(name=b'', addr=None)
中央设备发起连接。name 和 addr 参数,二选一。可通过BLE广播的设备名称来连接。或者你已知要连接的外围设备的 MAC 地址,可通过 addr 参数发起连接。
如连接成功后,则返回 被连接设备的 GATT Profile 对象。如,连接不成功或扫描不到设备则返回 None 。
-
Centeral.is_connected()
返回中央设备与外围设备是否连接。True 为连接, False 为未连接。
-
Centeral.characteristic_read(value_handle)
读取被连接的外围设备的属性值
- value_handle - Characteristic的值柄。
-
Centeral.characteristic_write(value_handle, data)
写被连接的外围设备的属性值
- value_handle - Characteristic的值柄。
- data - 写入的字节数据。类型为 Bytes 。
-
Centeral.notify_callback(callback)
当被连接的外围设备,发起notify通知事件,告知特征属性被改写。 回调函数的参数定义 callback_function(value_handle, notify_data) value_handle 参数为属性的值柄, notify_data 参数为通知的属性值。
-
Centeral.connected_info
连接成功后, connected_info 有被连接的外围设备的设备信息元组。 格式: (addr_type, addr, name, adv_type, rssi)
-
Centeral.disconnect()
中央设备断开与外围设备的连接。
BLEUART类
UART服务是在连接的设备之间发送和接收数据的标准方法,它模拟了熟悉的两线UART接口(一根线用于传输数据,另一线用于接收数据)。
该服务模拟通过两条线路TXD和RXD的基本串口连接。 它基于Nordic Semiconductors专有的UART服务规范。可以使用Nordic Semiconductors用于Android和iOS的nRFUART应用查看与该服务之间收发的数据。
Nordic的UART UUID("6E400001-B5A3-F393-E0A9-E50E24DCCA9E") 服务包括以下特征:
| Name | UUID | 权限 |
| TX | 0x0002 | write |
| RX | 0x0003 | read/notify |
- TX : 此特性用于将数据发送回传感器节点,并且可以由连接的中央设备(移动电话,平板电脑等)写入。
- RX : 此特性用于将数据发送到连接的中央设备。可以通过连接的设备启用通知,以便每次更新TX通道时发出警报
构建对象
-
class
BLEUART(name=b'ble_uart', appearance=0, rxbuf=100, role=BLEUART.SLAVE, slave_mac=None)
UART服务的外围设备, 可用于模拟串口数据收发。对于初级BLE用户,可不用关注BLE协议,即可达到两设备之间的通讯。支持主从机模式设置,默认为从机模式。
name - 当为slave模式时,蓝牙设备名称。类型为字节类型。当为master时,`name`参数为你需要设备的名称。
appearance - 16-bit 数字编码。定义蓝牙设备的外观,像电脑或手机会根据该外观标识,给定外观图标。默认为Unknown(0)。
rxbuf - UART的接收缓存大小设置,单位为 Byte。
role - 设置UART的角色,主,从机,默认为从机。当为master模式,__init__() 为阻塞,直至连接成功才会完成实例。
- BLEUART.SLAVE
- BLEUART.MASTER
slave_mac - 默认为None。在master模式在默认连接 name 参数名称的ble设备,你也可以指定连接设置mac地址。类型为 Bytes。
HID类
HID设备(Human Interface Devices),即人机交互设备,常见的有鼠标,键盘,游戏手柄,遥控器等等。一般有线方式都是通过USB连线连接到机器设备,作为用户输入设备。 在蓝牙BLE技术中,通过GATT配置HID Service实现无线的HID设备应用。
HID类实现以下的BLE HID设备:
- 键盘设备
- 鼠标设备
- 消费类设备(例如遥控器)
构建对象
-
class
HID(name=b'mpy_hid', battery_level=100)¶ - name - HID设备名称,类型为 Bytes 。
- battery_level - 设置HID设备的电池电量
公共方法
-
HID.advertise(toggle=True)
HID设备广播开关。 toggle 为 True 则,开始广播; False 则停止广播。
-
HID.disconnect()
HID设备断开与中央设备的连接
-
HID.battery_level
返回或配置HID设备的电池电量
鼠标设备
HID鼠标设备的函数方法
-
HID.mouse_click(buttons)
点击鼠标按键。buttons 为鼠标按键。你可以使用 | 或逻辑运算实现多个按键同时按下操作。
鼠标按键常量见, hidcode.Mouse 。
>>> from mpython_ble.application import HID
>>> from mpython_ble.hidcode import Mouse
>>> mouse = HID()
>>> mouse.mouse_click(Mouse.LEFT) # left button
-
HID.mouse_press(buttons)
按住鼠标按键。使用同上述。
-
HID.mouse_release(buttons)
释放鼠标按键。使用同上述。
-
HID.mouse_release_all()
释放所有鼠标按键。
-
HID.mouse_move(x=0, y=0, wheel=0)
鼠标光标移动、滚轮。
- x, y - 光标移动量,范围 ±127 。
- wheel - 滚轮,范围 ±127 。
键盘设备
HID键盘设备的函数方法
提示
按键键值常量见, hidcode.KeyboardCode 。如果你的可用内存不多,不建议你使用 hidcode 模块。你可按需,自行定义常量,减少不必要
的内存浪费。
-
HID.keyboard_send(*keycodes)
点击键盘按键,支持单个或多个按键按下。keycodes 为键盘的键值。一次不能超过6个按键。
>>> from mpython_ble.application import HID
>>> form mpython_ble.hidcode import KeyboardCode
>>> hid = HID()
>>> hid.keyboard_send(KeyboardCode.CONTROL,KeyboardCode.D) # ctrl-d
-
HID.keyboard_press(*keycodes)
按住键盘按键。使用同上述。
-
HID.keyboard_release(*keycodes)
释放键盘按键。使用同上述。
-
HID.keyboard_release_all()
释放所有按键。使用同上述。
mpython_ble.gatts
GATT(Generic Attribute Profile)通用属性配置文件,描述了一种使用ATT的服务框架 该框架定义了服务(Server)和服务属性(characteristic)。
Profile类
GATT Profile是Services和Characteristics的高级嵌套。Profile包含一个或多个的 Service 服务; 一个 Service 服务包含一个或多个 Characteristic 特征; Characteristic 特征可包含 Descriptors 描述符(也可以没有)。用于设备应用服务描述,比如心率计要有哪些服务、哪些特性、哪些描述符等。
-
class
Profile
Profile 是 Service 服务对象的集合。
方法
-
Profile.add_services(*services)
添加 Service 服务。services 参数为 Service 类的实例对象。
-
Profile.services_uuid
返回 Profile 内的 Service 服务的 UUID 对象元组。
-
Profile.definition
返回服务定义services_definition。services_definition是服务元组,其中每个服务包含 UUID 和特征的两元组。 每个特征是包含UUID、flags值(属性权限)、可选的描述符列表的两或三元组。 每个描述符包含UUID和 flags值的两元组。
提示
该函数用于 BLE.gatts_register_services() 服务注册函数services_definition参数组建。
-
Profile.handles
返回值Profile 的 Characteristic 特征 和 Descriptors 描述符的 value_handle 值柄的元组的列表。 每个服务一个元组, 每个服务元组是服务内定义的顺序特征和描述符句柄展平。
提示
用于 BLE.gatts_register_services() 服务注册后, 返回属性值柄映射到 GATT Profile内的对应属性 Characteristic 对象, Descriptor 对象的 value_handle 值柄。
mpython_ble.services
Service类
服务可以具有一个或多个特征,并且每个服务都通过称为UUID的唯一数字ID与其他服务区分开, UUID可以是16位(蓝牙协议定义的正式的BLE服务)或128位(自定义服务)。
可以在Bluetooth 标准协议的 org.bluetooth.servic 上查看已定义的正式的BLE服务。 例如,如果您查看“ 心率服务”,我们可以看到此正式采用的服务具有16位UUID 0x180D,并包含多达3个特征,尽管只有第一个是必选的:心率测量,人体传感器位置和心率控制点。
构建对象
-
class
Service(uuid)
Service 是 Characteristic 特征对象的集合。
- uuid 为Service的UUID实例对象。
例如, 心率服务 Heart Rate ( org.bluetooth.service.heart_rate) 的16位UUID为 0x180D :
>>> from mpython_ble.services import Service
>>> from mpython_ble import UUID
>>> heart_rate_service = Service(UUID(0x180D))
>>> heart_rate_service
<Service UUID16(0x180D)>
方法
-
Service.add_characteristics(*characteristics)
在服务中添加characteristics特征。返回添加后的Service自身。
- characteristics 参数为
Characteristic对象。
在Heart Rate Service(org.bluetooth.service.heart_rate) 添加 Heart Rate Measurement 心率测量特征,UUID为0x2A37:
>>> from mpython_ble.characteristics import Characteristic
>>> heart_rate_measurement_chara = Characteristic(UUID(0x2A37),properties ='-r')
>>> heart_rate_service.add_characteristics(heart_rate_measurement_chara)
-
Service.uuid
返回Service服务的 UUID 对象。
>>> heart_rate_service.uuid
UUID16(0x180D)
-
Service.handles
返回Service包含的属性值柄元组。服务元组是服务内定义的顺序特征和描述符句柄展平。
提示
该函数用于 BLE.gatts_register_services() 服务注册后, 返回属性值柄映射到 GATT Profile内的对应属性 Characteristic 对象, Descriptor 对象的 value_handle 值柄。
-
Service.definition
返回服务定义services_definition中的Service元组。服务包含 UUID 和特征的两元组。 每个特征是包含UUID、flags值(属性权限)、可选的描述符列表的两或三元组。 每个描述符包含UUID和 flags值的两元组。
提示
该函数用于 BLE.gatts_register_services() 服务注册函数,依照 services_definition 要求组建服务元组。
mpython_ble.characteristics
Characteristic类
GATT事务中最底层的概念是特性,与服务类似,每个特征都通过预定义的16位或128位UUID进行区分,您可以自由使用Bluetooth SIG定义的标准特征(这可以确保跨BLE和启用BLE的硬件/软件的互操作性)或定义自己的自定义特征,只有外围设备和软件才能理解。
例如,心率测量特性对于心率服务是必填项,并且使用0x2A37的UUID。它从描述HRM数据格式的单个8位值开始(无论数据是UINT8还是UINT16等),然后继续包含与该配置字节匹配的心率测量数据。 特性是您将与BLE外设进行交互的重点,因此理解这一概念很重要。它们还用于将数据发送回BLE外设,因为您也可以写入特征。
构建对象
-
class
Characteristic(uuid, properties='-r')
Characteristic 由Properties、值柄, 一个或者多个Descriptor组成(可选项)。 是GATT profile中最基本的数据单位。
uuid - 为Service的UUID实例对象。
properties - 特征的权限设置,定义了characteristic的Value如何被使用。类型为字符串。
- 可读 - 'r'
- 可写 - 'w'
- 通知 - 'n'
心率测量特征点:
>>> from mpython_ble.characteristics import Characteristic
>>> heart_rate_measurement_chara = Characteristic(UUID(0x2A37),properties ='-r')
方法
-
Characteristic.add_descriptors(*descriptors)
在特征中添加descriptors描述符。返回添加后的Characteristic自身。
- descriptors 参数为
Descriptors对象。
descriptors用于描述Characteristic Value相关的信息,作为非必须选项。(例如value记录距离长度,那么Descriptor可以是长度单位m/km)。
-
Characteristic.value_handle
返回 Characteristic 的值柄,在 gatts_register_services() 服务注册前。默认为 None 。
-
Characteristic.uuid
返回Characteristic服务的 UUID 对象。
-
Characteristic.handles
返回Characteristic包含的属性值柄元组。
提示
该函数用于 BLE.gatts_register_services() 服务注册后, 返回属性值柄映射到 GATT Profile内的对应属性 Characteristic 对象, Descriptor 对象的 value_handle 值柄。
-
Characteristic.definition
返回服务定义services_definition中的Characteristic元组。特征元组是包含UUID、flags值(属性权限)、可选的描述符列表的两或三元组。
提示
该函数用于 BLE.gatts_register_services() 服务注册函数,依照 services_definition 要求组建服务元组。
mpython_ble.descriptors
mpython_ble.hidcode
HID设备(Human Interface Devices)键值常量定义
提示
如果你的可用内存不多,不建议你使用 hidcode 模块。你可按需,自行定义常量,减少不必要的内存浪费。
KeyboardCode
-
class
KeyboardCode¶ -
KeyboardCode.A = 0x04
aandA-
KeyboardCode.B = 0x05
bandB-
KeyboardCode.C = 0x06
candC-
KeyboardCode.D = 0x07
dandD-
KeyboardCode.E = 0x08
eandE-
KeyboardCode.F = 0x09
fandF-
KeyboardCode.G = 0x0A
gandG-
KeyboardCode.H = 0x0B
handH-
KeyboardCode.I = 0x0C
iandI-
KeyboardCode.J = 0x0D
jandJ-
KeyboardCode.K = 0x0E
kandK-
KeyboardCode.L = 0x0F
landL-
KeyboardCode.M = 0x10
mandM-
KeyboardCode.N = 0x11
nandN-
KeyboardCode.O = 0x12
oandO-
KeyboardCode.P = 0x13
pandP-
KeyboardCode.Q = 0x14
qandQ-
KeyboardCode.R = 0x15
randR-
KeyboardCode.S = 0x16
sandS-
KeyboardCode.T = 0x17
tandT-
KeyboardCode.U = 0x18
uandU-
KeyboardCode.V = 0x19
vandV-
KeyboardCode.W = 0x1A
wandW-
KeyboardCode.S = 0x1B
xandX-
KeyboardCode.Y = 0x1C
yandY-
KeyboardCode.Z = 0x1D
zandZ-
KeyboardCode.ONE = 0x1E
1and!-
KeyboardCode.TWO = 0x1F
2and@-
KeyboardCode.THREE = 0x20
3and#-
KeyboardCode.FOUR = 0x21
4and$-
KeyboardCode.FIVE = 0x22
5and%-
KeyboardCode.SIX = 0x23
6and^-
KeyboardCode.SEVEN = 0x24
7and&-
KeyboardCode.EIGHT = 0x25
8and*-
KeyboardCode.NINE = 0x26
9and(-
KeyboardCode.ZERO = 0x27
0and)-
KeyboardCode.ENTER = 0x28
Enter
-
KeyboardCode.ESCAPE = 0x29
Escape
-
KeyboardCode.BACKSPACE = 0x2A
Delete backward (Backspace)
-
KeyboardCode.TAB = 0x2B
Tab and Backtab
-
KeyboardCode.SPACE = 0x2C
Space
-
KeyboardCode.MINUS = 0x2D
-` and ``_-
KeyboardCode.EQUALS = 0x2E
=` and ``+-
KeyboardCode.LEFT_BRACKET = 0x2F
[and{-
KeyboardCode.RIGHT_BRACKET = 0x30
]and}-
KeyboardCode.BACKSLASH = 0x31
\and|-
KeyboardCode.POUND = 0x32
#and~-
KeyboardCode.SEMICOLON = 0x33
;and:-
KeyboardCode.QUOTE = 0x34
'and"-
KeyboardCode.GRAVE_ACCENT = 0x35
`and~-
KeyboardCode.COMMA = 0x36
,and<-
KeyboardCode.PERIOD = 0x37
.and>-
KeyboardCode.FORWARD_SLASH = 0x38
/and?-
KeyboardCode.CAPS_LOCK = 0x39
Caps Lock
-
KeyboardCode.F1 = 0x3A
Function key F1
-
KeyboardCode.F2 = 0x3B
Function key F2
-
KeyboardCode.F3 = 0x3C
Function key F3
-
KeyboardCode.F4 = 0x3D
Function key F4
-
KeyboardCode.F5 = 0x3E
Function key F5
-
KeyboardCode.F6 = 0x3F
Function key F6
-
KeyboardCode.F7 = 0x40
Function key F7
-
KeyboardCode.F8 = 0x41
Function key F8
-
KeyboardCode.F9 = 0x42
Function key F9
-
KeyboardCode.F10 = 0x43
Function key F10
-
KeyboardCode.F11 = 0x44
Function key F11
-
KeyboardCode.F12 = 0x45
Function key F12
-
KeyboardCode.PRINT_SCREEN = 0x46
Print Screen (SysRq)
-
KeyboardCode.SCROLL_LOCK = 0x47
Scroll Lock
-
KeyboardCode.PAUSE = 0x48
Pause (Break)
-
KeyboardCode.INSERT = 0x49
Insert
-
KeyboardCode.HOME = 0x4A
Home
-
KeyboardCode.PAGE_UP = 0x4B
Go back one page
-
KeyboardCode.DELETE = 0x4C
Delete forward
-
KeyboardCode.END = 0x4D
End
-
KeyboardCode.PAGE_DOWN = 0x4E
Go forward one page
-
KeyboardCode.RIGHT_ARROW = 0x4F
Move the cursor right
-
KeyboardCode.LEFT_ARROW = 0x50
Move the cursor left
-
KeyboardCode.DOWN_ARROW = 0x51
Move the cursor down
-
KeyboardCode.UP_ARROW = 0x52
Move the cursor up
-
KeyboardCode.KEYPAD_NUMLOCK = 0x53
Num Lock
-
KeyboardCode.KEYPAD_FORWARD_SLASH = 0x54
Keypad
/-
KeyboardCode.KEYPAD_ASTERISK = 0x55
Keypad
*-
KeyboardCode.KEYPAD_MINUS = 0x56
Keyapd
--
KeyboardCode.KEYPAD_PLUS = 0x57
Keypad
+-
KeyboardCode.KEYPAD_ENTER = 0x58
Keypad Enter
-
KeyboardCode.KEYPAD_ONE = 0x59
Keypad
1and End-
KeyboardCode.KEYPAD_TWO = 0x5A
Keypad
2and Down Arrow-
KeyboardCode.KEYPAD_THREE = 0x5B
Keypad
3and PgDn-
KeyboardCode.KEYPAD_FOUR = 0x5C
Keypad
4and Left Arrow-
KeyboardCode.KEYPAD_FIVE = 0x5D
Keypad
5-
KeyboardCode.KEYPAD_SIX = 0x5E
Keypad
6and Right Arrow-
KeyboardCode.KEYPAD_SEVEN = 0x5F
Keypad
7and Home-
KeyboardCode.KEYPAD_EIGHT = 0x60
Keypad
8and Up Arrow-
KeyboardCode.KEYPAD_NINE = 0x61
Keypad
9and PgUp-
KeyboardCode.KEYPAD_ZERO = 0x62
Keypad
0and Ins-
KeyboardCode.KEYPAD_PERIOD = 0x63
Keypad
.and Del-
KeyboardCode.KEYPAD_BACKSLASH = 0x64
Keypad
\\and|-
KeyboardCode.KEYPAD_EQUALS = 0x67
Keypad
=(Mac)-
KeyboardCode.F13 = 0x68
Function key F13 (Mac)
-
KeyboardCode.F14 = 0x69
Function key F14 (Mac)
-
KeyboardCode.F15 = 0x6A
Function key F15 (Mac)
-
KeyboardCode.F16 = 0x6B
Function key F16 (Mac)
-
KeyboardCode.F17 = 0x6C
Function key F17 (Mac)
-
KeyboardCode.F18 = 0x6D
Function key F18 (Mac)
-
KeyboardCode.F19 = 0x6E
Function key F19 (Mac)
-
KeyboardCode.LEFT_CONTROL = 0xE0
Control modifier left
-
KeyboardCode.CONTROL = LEFT_CONTROL
Control modifier
-
KeyboardCode.LEFT_SHIFT = 0xE1
Shift modifier left
-
KeyboardCode.SHIFT = LEFT_SHIFT
Shift modifier
-
KeyboardCode.LEFT_ALT = 0xE2
Alt modifier left
-
KeyboardCode.ALT = LEFT_ALT
Alt modifier
-
KeyboardCode.OPTION = ALT
Labeled as Option on some Mac keyboards
-
KeyboardCode.LEFT_GUI = 0xE3
GUI modifier left
-
KeyboardCode.RIGHT_CONTROL = 0xE4
Control modifier right
-
KeyboardCode.RIGHT_SHIFT = 0xE5
-
KeyboardCode.RIGHT_ALT = 0xE6
-
KeyboardCode.RIGHT_GUI = 0xE7
-
ConsumerCode
消费类常量
-
class
ConsumerCode¶ -
ConsumerCode.POWER = 0x30
-
ConsumerCode.CHANNEL_UP = 0X9C
-
ConsumerCode.CHANNEL_DOWN = 0X9D
-
ConsumerCode.RECORD = 0xB2
-
ConsumerCode.FAST_FORWARD = 0xB3
-
ConsumerCode.REWIND = 0xB4
-
ConsumerCode.SCAN_NEXT_TRACK = 0xB5
-
ConsumerCode.SCAN_PREVIOUS_TRACK = 0xB6
-
ConsumerCode.STOP = 0xB7
-
ConsumerCode.EJECT = 0xB8
-
ConsumerCode.PLAY_PAUSE = 0xCD
-
ConsumerCode.MUTE = 0xE2
-
ConsumerCode.VOLUME_DECREMENT = 0xEA
-
ConsumerCode.VOLUME_INCREMENT = 0xE9
-
mpython_ble.beacon
iBeacon是苹果推出一项基于蓝牙Bluetooth BLE的精准微定位技术。iBeacon基站不断向四周发送蓝牙信号,当 智能设备进入设定区域是,就能收到信号。
正如beacon英文信标、灯塔的字面意思,这种设备以一定的时间间隔发送数据包,并且发送的数据可以被像手机这样的设备获取。 同时与信标的远近可以根据信标的信号强度大小来判断,距离越远,信标信号越弱。根据距离远近,分了4个状态。
- Immediate
- Near
- Far
- Unknown
iBeacon类
构建对象
-
class
iBeacon(proximity_uuid, major, minor, company_id=0x004C, tx_power=0xC5)¶ - proximity_uuid - Beacon设备机构的UUID。该参数为UUID对象。如,UUID("01122334-4556-6778-899a-abbccddeeff0")
- major - 区分位置信息,major一般表示分组编号。
- minor - 区分位置信息,minor一般表示组内编号。
- company_id - 公司的身份标识号,默认使用0x004C,代表Apple。
- tx_power - Measured Power。模块与接收器之间相距1m时的参考接收信号强度。